for a New or Reworked Mold
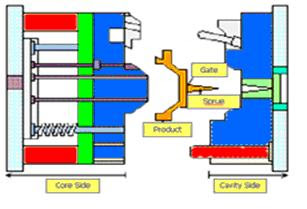
there are following important point to check list when assembly a new or reworked mold, following pinture below show three plate mold when all parting line open

• Check all shutoff areas with spotting blue. Tryout any pieces to be insert molded in assembly, check fit and shutoff
• The cavity & core blocks have 0.002 preload per side (above the mold base plates)
• Cavity surface finish is correct to print. As a rule remove all tool and EDM marks, especially deep ribs.
• Check for nicks, scratches, damaged edges or corners, chipped or damaged pins and damaged or loose pin holes.
• All cavities have been numbered, and have part numbers (if applicable)
• All inserts are numbered to correspond to cavity numbers. Details should be stamped with detail number and material type
• Tool has pry slots (on back side of "A", both sides of "B", & top of "Ejector" plate) and is chamfered in correct areas
• Water line countersink diameter is correct for Jiffy-Tite plug being used. Check plug holes for smoothness, lead in chamfer, & cleanliness. Sealant has been used on all threads. Jiffy plugs, regular plugs, baffles, and bubblers are in place and have been flow and pressure tested.
• Mold Info has been stamped correctly on the Support plate, all water lines are clearly stamped, and stamp "top of mold" and "operator side" on the appropriate sides
• Verify that all cavities have gates and the gates are the same size.
• All sliding parts must have grease grooves, be lubricated, and move easily.
• Verify that slides do not interfere with ejector pins or other moving components. Verify that travel is sufficient to clear molded part
• Check for proper clearance on angle pins, and slides when entering opposite side. Make sure pins don't bottom out. Check if slides lock properly in slide retainer.
• All limit switches must be orientated properly for wiring and function.
• Check hydraulic cylinders for length of stroke.
• K.O. holes are in correct location and tapped to correct dimensions (if applicable).
• Verify that all pins, sleeves and lift cores have the proper hole clearance, head clearance and proper depth clearance. All pins and sleeves must have lead in clearance and lead in chamfer in core insert. Must be a smooth transition.
• All return and ejector pins, and support pillars are the correct length, ejector system moves easily, all pins are in place (and should be marked for proper location), and the entire assembly lubricated
• Push ejector plate forward and check if all pins, sleeves, lift cores and all other moving components spin freely. Wiggle to verify correct clearance and that all components move freely
• Check that ejector plate can use the full length of travel and has spring return if needed. Check if runner & part will clear the core
• Verify that sprue puller design will work as needed
• Open and close tool in assembly to check for any interference. Activate any and all side actions and lifters to check for proper travel and interference of any kind
• All core pins are the correct length, and all pins are in place, do the necessary pins shutoff?
• Runner must be benched smooth with rounded corners and transitions. Gate to Runner transition should be blended smooth. (Parting Line edges stay sharp)
• All runners are vented at every direction change, and part detail is vented directly opposite the gate, at the parts ends & corners, and every 2 inches in between as necessary. Vent all guide pins
• Verify that all plates have eyebolt holes on every side
• Safety strap is attached to mold between A and B halves on the operator side
• Locating ring and sprue bushing are in place, and sprue radius and orifice diameter is correct size. Sprue Busing is rotation locked and retained
• Clamp slots are in place and free from any interference.
• If inserts are fit on surface plate, check fit in assembly also.
• Demagnetize all components.
• All screws/bolts are in place and tight. (Follow a pattern to prevent missing a screw)
• Verify that cavity, core, slides, mold base and all other applicable parts are clean and clear of chips, debris, and benching grit, and spotting blue, especially deep ribs and bosses.
• Check all holes for missing pins by looking in every hole of the assembled mold.
• Verify that parting line locks function properly.
• Open and close mold on bench that everything functions properly. Check if slides clear ejector pins, lift cores and any other moving parts with sufficient clearance and that mold closes freely.
• On hot sprue bushing, check if it is properly installed and assembled, make sure all components are installed and no wires are broken or damaged. Check that wire channel is in mold base and that clamps are in place to hold wires.
• Water lines must be pressure tested with diversion plugs, "O" rings and correct jiffy-plugs installed
• All slides, core pins, angle pins, cam locks and guide pins must be greased.
• For Hot Runner molds check the size and fit of every drop diameter. Check overall lengths and heights to verify heat expansion and proper "crush".
• For Hot Runner molds check that all wiring is in a channel, free from damage, and free from possible "pinches" during assembly. Check continuity all all circuits (compare all zones to the drawing, note any changes or additions)
• For Three-Plate molds, verify that all latches function properly, that they latch and release in assembly, and that plate separation is sufficient to let both the part AND the runner drop through. Also check that all latch dowel pins are secured so as not to come loose during operation.
• Tool is sprayed with WD-40 or equivalent for shipping


